Showing posts with label entrees. Show all posts

Sunday, August 26, 2012

Balsamic Chicken Tortellini


I'm baaaaaaack!  This summer has been a whirlwind for us, and it seems that new recipes always move to a back-burner when life gets in the way.  Here's a recipe I found on Pinterest at the beginning of the summer.  We've made it many times, and think you'll like it too.

1 (19 oz) pkg cheese tortellini - frozen or fresh (up to you!)
1 c grape tomatoes, cut in halves
1 c flat-leaf spinach, chopped
1 large boneless chicken breast
1/2 c Newman's Own Lite Balsamic Vinaigrette dressing
1 1/2 tsp dried basil
salt and pepper

Prepare tortellini according to directions.  Allow to cool for 10 minutes in strainer.

Cut chicken breast into bite-sized pieces, and cook over medium-high heat until thoroughly done.  Toss in 2-3 TBSP balsamic dressing and coat chicken.

Chop spinach and cut tomatoes.

Add chicken, spinach, and tomatoes to bowl with tortellini.  Toss in balsamic dressing until evenly coated.  Sprinkle with dried basil (I used about 1 1/2 tsp) and add salt and pepper to taste.

Serve immediately, or chill for a few hours before serving.

Comments from the cook:  We love pasta salad around here, and this one is a great addition to our arsenal.  The balsamic dressing listed above has been one of our favorites for a while, so basing a dish around it couldn't fail.  

We modified the recipe just slightly from the original (we don't marinate the chicken, and don't use the ground mustard), and have loved the results.  We have used fresh tortellini and really liked it...but have also had success with the frozen kind for a lot less (the Great Value brand at Walmart is about $2.75). We also use fresh basil when it's in season, and use 8-10 leaves diced for the recipe.

Originally found here, which links back to this great site.

P.s. May we have a quick moment of silence for how the countertops in this new apartment are SO MUCH BETTER LOOKING than the ones in the last!?  Hooray, times one thousand...

Monday, November 21, 2011

Cheesy Stuffed Shells

My sister-in-law made this recipe for us quite a while ago (2006, when did you become so long ago!?) and I found it in my recipe binder this last winter, and resurrected it. YUM!

24-30 jumbo pasta shells
2 eggs
1 (15oz) container cottage cheese
2 c mozzarella cheese, shredded
1/4 c grated Parmesan cheese
2 tsp dried parsley leaves
1 1/2 tsp garlic salt
2 cups marinara sauce

Cook jumbo pasta shells as directed on packaging. Run cool water over them to halt further cooking.

Pour 1/2 cup of marinara sauce into the bottom of a 9x13 pan.

In a separate bowl, combine eggs, cottage cheese, mozzarella cheese, Parmesan cheese, parsley, and garlic salt. Stir until combined.

Spoon a heaping spoonful of filling into each pasta shell. Place in pan, and cover with remaining marinara sauce. Cover with foil.

Bake at 350° for 30 minutes. Remove foil, and cook for 5-10 more minutes, or until bubbly.

Comments from the cook: This is an excellent recipe that we love at our house. We think the leftovers might even be better than the fresh product!

I use canned marinara sauce for this recipe, but made it with Brian's homemade sauce a few times ago. It was excellent!


Originally shared by my SIL, Meredith, and adapted from a recipe found in one of her cookbooks (source unknown).

Friday, November 11, 2011

Hearty Beef Stew

I wanted to make beef stew the other day, and the seasoning packets at our local grocery store were nearly $3(!), so I tried my hand at homemade. I cracked my Betty Crocker cookbook for a few pointers, and the result was great! For the record, we won't be buying packets ever again...

1 lb beef stew meat
1/2 medium onion
10-12 baby carrots, sliced
1 cup beef broth
1/3 c flour
1 tsp salt
1 tsp sugar
1 tsp marjoram
1/4 tsp pepper
1/2 tsp garlic powder
6 russet potatoes, cut into 1" chunks
6 c water

Brown stew meat in a frying pan, and add to CrockPot. Add sliced onion, carrots, and potatoes.

Add beef broth and water (6 cups is an estimate...I just added enough to partially cover the vegetables, so they would cook thoroughly).

Add spices and flour. Stir together until mixed.

Allow to cook in CrockPot for 3-4 hours on high.

Comments from the cook: Brian works out of town on Wednesday afternoon/evening, and always needs to take dinner with him. Beef stew is one of his all-time favorites, so I threw this in the CrockPot a little before noon. I was nervous that it wouldn't be done soon enough, but by 3:45 it was perfectly cooked.

I also loved that this stew didn't require any kind of thickening! Adding flour in the initial stages is all you need to do, and the thickness is perfect after 3-4 hours.

Many ingredients/quantities taken from "Betty Crocker's Cookbook - Beef Stew" recipe (found on pg 465)

Sunday, November 6, 2011

Chile Verde Burritos

I went to a Relief Society mid-week activity on easy freezer meals, and this is one of the recipes that was shared by the teacher. I knew it sounded like something we'd like, even though it forced me to make amends with my Crockpot. It has quickly become one of our favorites, and I think you'll like it too!

1 TBSP oil
1-2 cloves garlic, minced
1 onion, chopped
1 green bell pepper, diced
6 boneless pork loin chops
7 oz. can diced green chiles
16 oz. jar salsa verde
19 oz. can green chile enchilada sauce
1 tsp oregano
1 tsp cumin
1 tsp chili powder
juice of one lime
salt and pepper, to taste
flour tortillas

Chop onion and bell pepper. Saute in oil (and add garlic) until vegetables are softened.

Add pork, then sauted onion and bell pepper to Crockpot. Continue to add green chiles, salsa verde, enchilada sauce, all spices and lime juice to mixture. Stir together.

Cook on high for 5-6 hours if pork is frozen and 4-5 hours if meat is defrosted.

After pork is thoroughly cooked, shred. Put back into the sauce and add salt and pepper to taste.

Comments from the cook: This recipe makes a LARGE amount, so I have always preferred to half everything. Doing so makes for about 5 burritos at our house, which is enough for us (plus leftovers). You can always make the full recipe and freeze the rest, according to our freezer meals teacher...

I have a very hot Crockpot, so I cooked this recipe for about 2 hours on high, then switched it to low for the remaining 3-4 hours. I also used a pork roast, which worked fine (except for my FATAL error of buying it bone-in...and having to remove the bone myself. Remember how I hate touching meat? Gag, barf, die.)

In order to amp this up even more, we ate our burritos enchilada style. We put the meat and sauce into tortillas, added a little bit of mozzarella cheese to the insides, rolled them up, covered them in sauce, topped them with more cheese and baked them at 400° or so for about 10 or 15 minutes...just to melt the cheese.

Originally shared by JoAnna Moss, freezer meal extraordinaire. :)

Thursday, July 7, 2011

Bacon Tomato Capellini


Holy grown-up bacon recipe! I saw this recipe on Tasty Kitchen, and thought it sounded amazing. Grown-up food with bacon as a main ingredient?! How could it fail, really? Turns out, it couldn't. A.MAZ.ING.

1 pkg (16 0z) bacon
¼ c bacon grease (from the bacon you cook)
1 large can (28 oz) diced tomatoes (we prefer petite diced)
¼ c fresh basil, chopped
1 clove minced garlic
½ bunch green onions, chopped
1 tsp salt (optional)
1 box (16 oz) capellini or angel hair pasta

Fry bacon in a large frying pan until done, but not crispy. When finished, allow bacon to cool on a paper-towel-covered plate. (Reserve 1/4 cup of bacon grease.)

When bacon is cooled, tear or cut it into small pieces. Set aside.

Pour tomatoes into large bowl. Mix fresh basil in. Set aside.

Put 1/4 cup bacon grease back in pan, and heat to medium. Add minced garlic and green onions. Once garlic has turned to a tan color, add the bacon pieces. Saute at low heat for 10 minutes.

Pour in the bowl of tomatoes and basil. Stir together and bring to a boil. Cover and simmer 20 minutes, stirring occasionally. Add salt if necessary.

Meanwhile, in a large pot, boil pasta. Drain noodles and set aside.

Right before serving, toss bacon/tomato sauce with noodles. Top with fresh Parmesan cheese.

Serves: 6-8

Comments from the cook: I made this dish on Sunday, and it was enough to eat for 3 nights! It is an excellent leftover, and reheats very well.

I didn't have green onions on hand when I made this, so I just used a dash or two of onion powder as a substitute.

We loved this, and will definitely be adding it to our recipe arsenal!

Originally found here, on this amazing recipe website.

Saturday, September 18, 2010

Banana Streusel Muffins


Muffins:

1 cup flour

1/2 c granulated sugar

3/4 tsp baking powder

1/2 tsp baking soda

1/2 tsp salt

4 TBSP (1/2 stick) unsalted butter, melted

1/2 cup plain yogurt)

1 lg egg, lightly beaten

1 lg banana, mashed

1 tsp vanilla
Topping:

1 TBSP cold butter, cut into pieces

1 TBSP brown sugar

3/4 tsp ground cinnamon

1 TBSP flour

salt

Preheat oven to 350°. Spray a loaf pan or muffin pan with non-stick cooking spray.
In a large bowl, whisk together 1 cup flour, the sugar, baking powder, baking soda and 1/2 teaspoon salt.
Stir in the melted butter and plain yogurt. Add the egg and beat for 1 minute. Add the banana and vanilla. Stir until well combined. Spread the mixture evenly into the prepared pan or into muffin tin (makes about 12 muffins).
Make topping by mashing together the tablespoon of cold butter with the tablespoon of flour, the brown sugar, cinnamon, nutmeg and a pinch of salt. Distribute the topping evening over the batter. Bake for 40-45 minutes for loaf or 20-25 minutes for muffins, or until toothpick comes out clean.
Cool for 10 minutes before removing from loaf pan or muffin tin.
Comments from the cook: A.Maz.Ing. These muffins represent one of my few cooking ventures since I've been so sick and pregnant. They are fantastic, and the streusel topping is to DIE FOR.
I doubled this recipe, and it made about 20 muffins. I've always been a fan of streusel, so I actually did a little more than the recipe called for. That can't hurt anything, right??
Best served with Mylanta...or your juice of choice! :)

Originally found on this website, taken from this book. (Most text taken from website).

Wednesday, April 21, 2010

Chicken Pasta Salad

(Hello, first real food pics from my new lens. You are beautiful. The end.)

4 svgs farfalle (bowtie) pasta
3 svgs garden rotini pasta
1 chicken breast
1/2 cup Italian dressing
1/2 cucumber, cut into 1/2" chunks
pasta salad seasoning, to taste

Prepare pastas as directed. Drain and run under cool water until room temperature (or cooler if desired).

Cut chicken breast into small chunks and pan fry over medium heat. Add 1 TBSP of Italian dressing to chicken chunks when chicken is almost finished cooking.

Toss chicken, cucumber, and pastas together.

Add dressing (amount is really up to you, and depends on your tastes) and pasta salad seasoning.

Best when served chilled for an hour or so. Serves 6+.

To rejuvenate the next day, toss with a bit more salad dressing and another couple of shakes of pasta salad seasoning.

Comments from the cook: I debated whether or not to post this recipe. It's not really MY recipe. It's just 6 ingredients. Nothing is really homemade (unless you call browning a chicken breast HOMEMADE). But we eat it (or some version of it) at least once a week in the summertime. And I'm the boss of this very food blog, so I can post whatever I want! :)

If you read my other blog, you'll know that pasta salad seasoning is a BIG DEAL to me. My mom found a seasoning called "Salad Elegance" long ago (made by Johnny's), we got hooked on it, and then I moved to Utah. It was hard to find there, but not impossible. And then the place I always bought it stopped carrying it. So I did what any normal person would do. I ordered a $30 2.5-lb tub of it. And I've not been happier with a purchase ever since.

McCormick makes a version called Salad Supreme (sold in the spice section), which will work, if you don't have access to the loveliness that is Salad Elegance. My observation was that McCormick's SS has more celery salt, and is not as light tasting...but we ate it when times were hard and Johnny's got the boot from our local store. Until we took matters into our own hands, that is.

Variations of pasta salad are endless. My mom has added fresh tomatoes and olives to hers before. We also do a version that is just spaghetti noodles, cut-up pepperonis, chunks of cheese, Italian dressing, and Salad Elegance (for dinner when we're trying to UP the taste and HOLD the healthy!)

Either way, this is one of our favorites. And, I tell you, I've never been happier to own $30 of a spice.

Originally made by my mom, Alane Sleight.

Tuesday, April 13, 2010

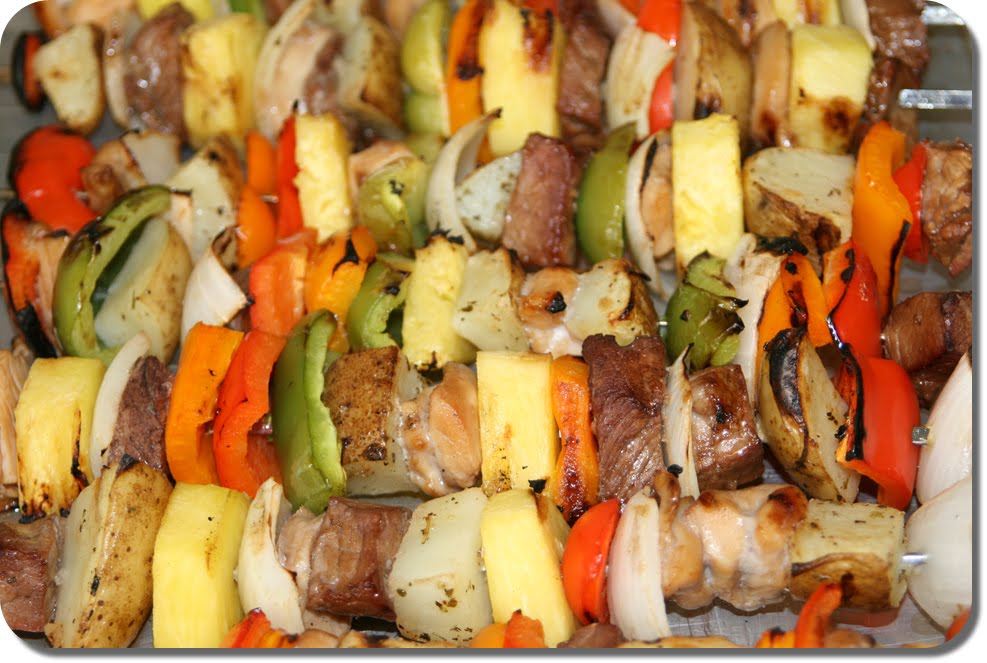
Teriyaki Kabobs

Marinade:
1 cup water
1 cup soy sauce
1 cup sugar
1 tsp garlic
2 TBSP green onion, chopped
1 tsp fresh ginger, grated

To be skewered:
1 green bell pepper
1 red bell pepper
1 small onion
1 fresh pineapple
fresh chicken breasts (frozen ok, defrosted)
steak (stew meat ok)

Potatoes:
3 russet (or red) potatoes
1 tsp rosemary
1 tsp thyme
1 tsp sea salt
1/2 tsp pepper
3 TBSP olive oil

Combine marinade ingredients in glass bowl. (Separate into 2 medium bowls if doing separate containers for chicken and beef).

Cut meat (chicken and beef) into 1" pieces and place in marinade. Refrigerate and allow to sit for 2 hrs.

In the meantime, cut potatoes into 1" pieces and boil for 4 minutes. Drain and allow to cool and dry on dishcloth for about 30 min. When cooled, toss in about 3 TBSP olive oil. Add rosemary, thyme, sea salt, and pepper.

Cut veggies and pineapple into 1" pieces.

Assemble skewers. Grease skewers slightly (dip your thumb and index finger in oil and run it down the skewer) before adding meat and veggies.

Alternate veggies, potatoes, meat, and pineapple as desired.

Heat grill to hottest temperature, and cook skewers evenly over fire. Rotate as needed.

Don't have a grill? Have one and it gives out? Broil them in the oven! Place skewers on a cookie sheet, and cook on top rack. Watch them closely and turn them every couple of minutes in order to avoid overcooking.

Comments from the cook's wife: This really is Brian's recipe, so I can't say much...beyond how much I LOVE these, and how much you need to try them!

The measurements for the marinade are not set in stone. If you don't think it's enough, double it. If you only want to make a few skewers worth, make a bit less. Brian learned to combine sugar, garlic, soy sauce, ginger, and green onions from a man on his mission, and has never been the same since! We have eaten many-a-meal with that sauce as a base, and look forward to more in the future.

We use metal skewers (we upgraded a year ago), but the inexpensive wood ones also work. We read online that they need to soak in water for about 30 minutes ahead of time. This apparently keeps the wood from burning as quickly.

Kabobs are very filling, but making a few extra might be just what you're looking for. They make for EXCELLENT leftovers. (Just push the meat and veggies off the skewer with a fork, and store them in an air-tight container. Reheat for 3-4 minutes in the microwave and enjoy again!)

A CookieSheets&CakePans original.

Monday, March 29, 2010

Bowtie Chicken Caesar Salad


1-2 servings farfalle (bowtie) pasta, prepared as directed
1 pkg chicken breast pieces, plain
1 medium tomato, diced
mozzarella cheese, grated
lettuce
croutons
caesar dressing

Prepare pasta as directed. Rinse with cold water until pasta is cool to the touch. Drain.

Wash, dry, then tear lettuce. Dice tomato and grate cheese.

Cut chicken into smaller pieces if desired. (The pre-packaged kind usually comes in fairly large strips, so we generally cut them down into smaller bite-sized chunks.)

Assemble and top with caesar dressing of your choice.

Comments from the cook: This is one of our warm-weather recipes of choice! When we were still in UT, my co-workers and I frequented a place called Pizza Factory for office birthdays. This was my favorite dish there (served with their classic bread-twist). When we moved, I realized that I could re-create it fairly easily.

No fancy ingredients and no extensive preparation required. You can dry your own croutons, whip up your own caesar dressing, and grow your own lettuce if you really want to...but this one's an easy summer meal that you should really try. We usually use romaine lettuce, but only had iceberg around. Would be tasty with spinach leaves tossed in as well.

If you're trying to save a few pennies (packaged chicken is usually about $2.50), use an old-fashioned frozen chicken breast and prep your own chicken pieces in a skillet. Add a bit of salad dressing right before they're done browning for extra flavor.

A CookieSheets&CakePans original...kinda. :)

Monday, March 22, 2010

Brian's Pizza Hut Pan Pizza & Breadsticks


Sauce:
1 (15oz) can tomato sauce
2 tsp dry oregano
1 tsp marjoram
1 tsp dry basil
1 tsp garlic salt

Dough:
1 1/3 cups warm water
1/4 cup non-fat powdered milk
1/2 tsp salt
4 cups flour
1 TBSP granulated sugar
1 package dry yeast
2 TBSP canola oil (for dough)
canola oil (for pan)
cooking spray

Pizza toppings:
mozzarella cheese
pepperoni

Breadstick seasoning:
2 TBSP parmesan cheese
1 1/2 TBSP garlic powder
1 1/2 tsp oregano
1 1/2 tsp onion salt

Combine sauce ingredients and allow to sit for 1 hr.

Put yeast, sugar, salt, and dry milk in KitchenAid bowl (or mixer of your choice).

Add water and mix well using whisk attachment. Let rest for 2 minutes.

Add oil and stir again. Let rest 2 more minutes.

Now using the hook attachment, add flour and stir until dough forms and flour is absorbed.

Remove from bowl and knead by hand for about 1 minute. Put back in KitchenAid bowl and knead with dough hook on medium speed for 4-5 minutes.

Roll out to 1/4"-3/8" for one large pizza and one small pan of breadsticks. Turn large (14") deep-dish pizza pan over top of dough. Press down hard (cookie-cutter style) to cut the dough. Use knife if cut is not entirely clean.

Collect cuttings. Roll out to same thickness, and turn small deep-dish pan (round 9" cake pan will work) over cuttings to slice.

After cutting and before placing dough in pizza pans, spray sides of pan with cooking spray. Add a small amount of oil to the bottom of the pizza and breadstick pans. Original recipe calls for a large quantity (tastes better, but a lot more fat!), but a thin coating to cover the bottom of the pan is sufficient.

Add dough to both pans. Cover with foil. Place in oven heated to lowest setting ("warm", usually) and allow to rise for 1-1 1/2 hrs.

Add sauce and toppings as desired, and cook at 475° until outer crust is brown.

For breadsticks:

Sprinkle with seasoning, then cook at 475° until edges of crust turn brown.


Comments from the cook: We were on a real knock-off kick for awhile, and this has become one of our staple pizza recipes. While the crust is not quite as chewy as Pizza Hut's pan pizza, the taste is very similar.

One of the most important things about this recipe is the pan. You must (read: MUST) use a deep dish pan. Using a flat pizza pan obviously won't work, but you can get creative otherwise. We've made it in a 13x9 pan before (and it worked perfectly) and have made it in multiple 9" round cake pans before too.

Funny story. Brian and I had been married about a year, and went home to be with my family for Thanksgiving. They wanted him to make this pizza (my brother, Neil, is the 2nd biggest pizza fan ever...behind Brian, that is) and we needed a large deep-dish pan in order to make pizza for such a large crowd. So we set out to find one. We didn't find anything in the pizza pan section at Wal-mart, until my mom was walking away. There was a large metal deep-dish pan sitting there that was PERFECT for the job. We needed 2, but only found the one...and figured we'd just use cake pans for the rest. We got to the register to find out how much the pan was. It rang up $3. Score! Best part? The description was PET DISH. ha! Sturdy, metal, and perfect for $3. When we returned from vacation, we went and bought 2 for ourselves. Still use them to this day. :)

Originally found online and adapted by Brian, the pizza king.

Wednesday, February 24, 2010

Beef Enchiladas


8 flour tortillas
1 can refried beans
1/2 lb ground beef, browned (ours were low on meat, so double if you'd like)
1 large can enchilada sauce (I used Las Palmas, mild)
1 packet McCormick enchilada flavoring
1 cup cheddar cheese

Warm enchilada sauce in medium sauce pan over medium-high heat. Add McCormick packet to enchilada sauce and stir well. Follow directions on McCormick packet (cook 10 minutes).

Spread about 1/2 cup of enchilada sauce in bottom of 9x13 pan.

Next, assemble!

Start with tortilla. Add a heaping tablespoon of refried beans to the shell and spread across length of shell.

Add ground beef. Add about one ladle full of enchilada sauce to tortilla. Sprinkle with cheese, then close. (I do this by lifting up both edges of the tortilla, bringing them together, then folding the two halves to the right and tucking them underneath as you place the finished enchiladas in the pan...so that the edge is at the bottom of the pan. But you can do whatever is easiest for you!)

Use remaining sauce to cover enchiladas, then sprinkle remaining cheese on top.

Bake at 425° for 20-25 minutes. Cover with foil if tops start to brown more quickly than you like.

Makes 8 enchiladas.

Comments from the cook: So, what's with the sauce, you ask? We usually just use tomato sauce and the McCormick seasoning...but decided to take it up a notch this time! You may even want to add a bit of water to thin it out too.

We use/ration the uncooked tortillas (available in UT at Costco) that we bought at Christmas...and they are excellent!

Serve with lettuce, sour cream, and any remaining refried beans.

A CookieSheets&CakePans original!

Thursday, February 18, 2010

Brian's Thin-Crust Pizza & Breadsticks

1 cup warm (but not hot) water
1 1/2 tsp yeast
1 1/2 tsp sugar
3 1/2 cups flour
1/4 cup oil
1/2 tsp salt

Add yeast and sugar to warm water. Stir until dissolved.

Add sugar/yeast/water mixture to a mixing bowl containing remaining ingredients (flour, salt, and oil).

Mix with dough hook on medium speed until dough forms a ball and no longer sticks to sides of mixing bowl.

Cover (moistening surface of dough with a bit of oil, if desired) and allow to rise for 1 hr 30 min.

Roll dough out.

Recipe makes enough dough for 2 large pizzas... or an extra large pizza and a small pan of breadsticks.

Bake crust only at 450° just until slightly browned. Add sauce and toppings, and return to oven until cheese is melted and pizza appears to be done.

For breadsticks:

Roll out, sprinkle with garlic salt, oregano, basil, and parmesan cheese. Add a bit of mozzarella if you're feeling crazy!

Comments from the cook: Another one of Brian's masterpieces! This recipe came from the same guy that gave him the awesome sauce recipe found in this recipe, and has been one of our favorites for a few years now.

And, beware...this crust can make a person fall in love with thin-crust!

Sunday, February 14, 2010

Super-Thick French Toast

French toast:

3 eggs
3/4 cup milk
1 loaf french bread, sliced into 1" slices
cinnamon sugar mixture

Heat griddle to 400°.

Combine eggs and milk. Whisk together with fork until combined. (I used a pie plate to prep this in...)

Dip french bread into mixture one side at a time, saturating.

Sprinkle hot griddle with cinnamon and sugar mixture (just covering area that one bread slice will take up).

Place saturated bread directly over cinnamon sugar mixture.

Sprinkle cinnamon sugar on top of saturated bread.

Flip and brown both sides until thoroughly cooked.

Comments from the cook: I like cinnamon in french toast, but have never liked how the cinnamon sits on top of the egg mixture and doesn't coat evenly. Using a sprinkling of cinnamon-sugar (we have a small shaker of it) and applying it directly to the soaked bread was the perfect solution!

Top with syrup or real whipped cream and strawberries. Makes 10-12 slices.

--

Butter syrup:

3/4 cup evaporated milk (fat free ok)
1 cup sugar
1/3 cup corn syrup
1 TBSP butter
1 tsp vanilla

Combine all ingredients and bring to a boil over medium high heat.

Heat at a rolling boil 2-4 minutes, until desired consistency is reached, stirring constantly.

Comments from the cook: Sometimes maple is a little strong for my tastes, so I wanted to try my hand at a butter syrup. I cooked my syrup on and off for about 4 minutes in hopes of getting the right texture. I boiled it, stirred it, took it off the heat to cool slightly, then would put it back on the heat when the texture seemed too thin. After several rounds of doing so, I overcooked it just slightly and my syrup was a little bit thicker than I was going for. But the taste was fantastic!

Our attempt to knock off the only-in-UT Kneaders french toast...and thus a CookieSheets&CakePans original!

Friday, February 5, 2010

Hamburger "Stuff"


4-6 medium potatoes, peeled and sliced
3-4 carrots, peeled and sliced
1/2 medium onion, sliced
1 can cream of chicken soup
1 can cream of celery soup
1 can water
approx 1lb ground beef, uncooked
salt and pepper, to taste

Use mandoline (fancy name for slicer) to slice potatoes, carrots, and onions. Or, if you're the old-fashioned type...use a knife and cutting board. :)

Place ground beef (defrosted if originally frozen) in bottom of roast pan. Cover with potatoes, carrots, then onions.

In a separate bowl, combine soups, salt and pepper, and water. Mix until smooth.

Pour soup mixture over other ingredients.

Bake covered at 350° for 3-4 hours. Makes 4-6 servings.

Comments from the cook: My mom made this for us last summer...and it was fantastic! It's a great, inexpensive substitute for pot roast - particularly for those of us that don't need a big roast that might take days and days to eat (even after we've cut it in half!).

This is an excellent dish to throw in the oven before church. I even tried this in my CrockPot, and cooked it on high for about 4 hours. The potatoes were much softer and the entire dish was a bit mushy compared to the oven-baked version. It still tasted good, but I liked the results better after baking it in the oven.


Disclaimer: Sometimes it's hard to get a good photograph of food that tastes really good, but isn't as appealing to the eyes. :)

Originally shared (and named) by my mom, Alane.

Friday, January 29, 2010

Orange Chicken

(Made with fresh chicken breast chunks)

(Made with frozen tenderloin chunks)

Chicken and breading:

1 TBSP oil
1 egg
1/4 c flour
1/4 c cornstarch
salt and pepper, to taste
2 large fresh chicken breasts, cut into large chunks (Tenderloins will also work, but pieces will obviously not be as thick. Same goes for frozen chicken.)

Combine egg, oil, and salt and pepper in medium mixing bowl.

Add chicken chunks to mixture and stir together, making sure that all pieces are coated.

Add flour and cornstarch to mixture.

(Don't be fooled. These steps must happen in this order. And the mixture may not look right to you, but it works. Promise!)

Heat oil on stove. You'll need it to be medium high to high, but not the highest heat. It needs to be hot enough to crisp the outside, but not so hot that the outside gets charred and inside isn't thoroughly cooked. (Remember my outrageous paranoia about meat not being thoroughly cooked?!)

Cook thoroughly and set chunks on plate covered with paper towel (to allow excess oil to drain).

Sauce: (**Makes enough for 2 installments...so cut ingredient amounts in half, or go with these quantities and freeze the rest. Freezes like a dream!**)

1 1/2 cups water
4 TBSP orange juice
1 cup packed brown sugar
1/3 cup rice vinegar
2 1/2 TBSP soy sauce
1/4 cup plus 1 tsp lemon juice
1/2 tsp minced fresh ginger
1/4 tsp minced garlic
1 rounded tsp chopped green onion
1/4 tsp crushed red pepper flakes
3 TBSP plus 1 tsp cornstarch
4 1/2 TBSP water

In a saucepan over medium-high heat, combine all of the sauce ingredients, except the cornstarch and 4 1/2 Tbsp water. Stir often while bringing mixture to a boil. When sauce reaches a boil, remove it from heat.

In a small bowl, combine cornstarch and 4 1/2 TBSP of cool water. Stir until cornstarch has dissolved. Pour this mixture into the sauce and set the pan over high heat. When sauce begins to bubble and thicken, remove it from heat.

Toss chicken chunks with half of the sauce (freeze the rest!) and serve over sticky rice.

Comments from the cook: Hello, and welcome to orange chicken heaven. Since we moved to Kansas, we haven't have access to Panda Express or the fab Chinese that we loved at Smith's in Utah. I stumbled upon this recipe, and my new-recipe-trying husband dove right in one night when I was under the weather. He touches the meat in this family (he really loves me), so he's technically the expert on this one. I've made the sauce, so I can take a LITTLE bit of ownership...

We use more orange juice than the original recipe calls for (quantities already adjusted above), and use all cornstarch instead of arrowroot. If you have it around, click on the links below to fancy up the recipe (then email me and explain to me what-in-the-world you're doing with arrowroot in your cupboards).

We have been searching for an easy orange chicken recipe for a while. Well, guess what? If you want good orange chicken, it takes a little work! Love, love, love this recipe. Am SURE you will too...

Endorsed by so-incredible photographer, Tara Whitney, on here (and she found it here). Some text taken from these websites.

Thursday, January 21, 2010

Almost Betty's Chili


1 lb lean ground beef
1 small onion, diced (about 1/2 cup)
2 garlic cloves, minced
1 lg can (28oz) diced tomatoes, undrained
1 can (16oz) chili beans in sauce, undrained
1 can (15oz) tomato sauce
2 TBSP chili powder
1 1/2 tsp ground cumin
1/2 tsp salt
1/2 tsp pepper

Brown beef in medium sauce pan with onions.

Combine all other ingredients, and cook in Crock Pot for 6-8 hours on Low.

Comments from the cook: I'll admit it. I've always been afraid to make homemade chili! Brian doesn't care for beans, but likes chili...when it's just right. I've been afraid to try my hand at it for that reason. I found this recipe on the Betty Crocker website, and thought I'd dive right in.

Betty's recipe calls for twice as much beef and onion. I thought such a large helping of beef might grow hair on a person's chest(!), so I opted out. And, as some of you know, I HATE onions. Love the flavor, but I hate when a dish is full of the soggy little devils.

We ate this with saltines and a bit of cheese on top. A new favorite!

Originally found here on the Betty Crocker website. Adapted to fit our tastes...

Monday, January 18, 2010

Brian's Homemade Pizza


Sauce
1 can petite diced tomatoes
1 can tomato sauce
1/4 cup chicken broth
1 tsp salt
1 clove minced garlic
1 1/2 TBSP fresh basil, minced (or the equivalent of dried basil)
1 TBSP fresh oregano, minced (or the equivalent of dried oregano)

Simmer for 30 min, stirring occasionally.

Crust
1 1/4 cup warm water
1 TBSP yeast
2 TBSP sugar
1/2 tsp salt
3 cups flour

Dissolve yeast in warm water.

Add sugar, salt, and 2 1/2 cups flour. Mix to form dough.

Add more flour (up to a 1/2 cup) if needed to pull together. Mix about 3 minutes.

Let rest for 10 minutes in bowl.

Flour your pizza peel and sprinkle it with cornmeal. Work the dough with your hands to stretch it before laying on your pizza peel. Roll it out a bit more if needed. Let it rest for another 10 minutes on the peel after you've rolled it out.

Add all toppings BEFORE transferring dough from pizza peel to hot pizza stone (heated to 450° in oven).

Cook for 12-15 minutes.

Comments from the cook:
I married a man who CANNOT get enough pizza! The only thing he loves more than making it? Eating it! He has been adding recipes to his quiver for a while now. This crust is one we tried just over a week ago. We are in love with the taste, and it's a quick one!

Brian got this sauce recipe from a man that visited the bell-tower at BYU a few years ago. The man owned the first pizza delivery restaurant in SLC. While this was not the recipe he used in his restaurant (too time-consuming, says he!), it was his personal favorite. Brian and I have yet to find a sauce recipe that matches it.


Also, we use dried spices in the winter time. Fresh ingredients are best, but one must find alternatives in winter!

Originally shared by Erica and the unnamed bell-tower pizza man.

Saturday, November 7, 2009

Peas and Potatoes


6 red potatoes, diced
1/2 bag frozen petite peas (these are sweeter than regular peas)
6 c milk
1/4 - 1/2 c sugar
cornstarch

Dice red potatoes. Bring to a boil in medium sized pot. Boil until cooked thoroughly.

When potatoes are nearly finished cooking, add peas to boiling water also. This will cool water down, but bringing it back up to a boil should be enough to cook the peas and finish cooking the potatoes.

Drain water and put back in pot.

Pour milk over peas and potatoes until they are covered (may be more or less than 6 cups, depending on the size of your potatoes).

Add cornstarch mixture (about 2 TBSP cornstarch mixed with an equal amount of water or milk) to pot of milk, potatoes, and peas.

Cook on medium high (NOT high) until mixture starts to bubble and thickens. Be very careful not to allow the milk to burn in the bottom of the pan. (Burnt milk taste is the worst!)

Stir in sugar and allow to cool. Add salt and pepper as desired.

Comments from the cook: I imagine that my Grandpa must've really enjoyed this...especially after a long, cold day on the ranch! In order to add more cowboy approval-ness, I think my Grandma made steak or hamburger patties to go with it.

This is one of my favorite dishes, and it's even better warmed up the next day. I like it fairly sweet, with a dash of pepper to add a little kick.

Originally shared by my mom, who learned it from my Grandma Tibbitts (which would make this "how to feed a hungry COWBOY" food!).

Thursday, October 22, 2009

Chicken Pot Pie


1 pkg ready-to-bake pie crusts (2 included)
5 small potatoes
2 TBSP butter or margarine
2-3 TBSP flour
1 cup milk
1 cup chicken broth
frozen peas
frozen carrots
chicken

Allow pie crust dough to defrost to room temperature. Put one crust in bottom of glass dish.

Cut chicken into small pieces and saute in a little bit of canola oil or cooking spray. Place on top of crust.

Dice potatoes (into 1/2" pieces) and pour over crust in dish. Add frozen peas and carrots to crust also, as desired. (Veggies are uncooked during assembly!)

In medium sauce pan, heat 2 TBSP butter or margarine over medium high heat. Once melted, add 2-3 TBSP flour to butter. Stir constantly, while adding 1 cup milk. Heat (and continue stirring) for 2 minutes. Mixture will thicken into a gravy.

After that 2 minutes is up, add 1 cup chicken broth and stir well until mixed (should only take a couple seconds of good stirring to be done). Remove from heat.

Pour gravy mixture over potatoes and vegetables in pan. Set aside.

Take your 2nd pie crust (that has not yet been used). Trim about 3/4" of crust off the edges. Place newly trimmed crust on top of the other to create a lid. Fold edges of bottom crust up and over.

Poke holes in top crust with a fork.

Bake at 375° for a hour or so. If top becomes too brown, cover in foil for remaining cook time.

Comments from the cook: I made this the other night, and only cooked it at 350 for about 55 min. The potatoes were still a little crispy, so we microwaved the whole thing for 3 minutes and they were perfect!

A CookieSheets&CakePans original! (Tutored by Cathy Green)

Saturday, October 17, 2009

Fresh Tacos


homemade pico de gallo
1/3 lb ground beef
taco seasoning
sour cream
shredded cheese
shredded lettuce
corn tortillas
cooking spray

Brown ground beef. Season with taco seasoning, as desired.

Warm griddle to 350°. Spray both sides of corn tortillas with cooking spray. Cook on both sides until golden brown.

Assemble all ingredients.

Comments from the cook: This recipe is HARDLY an original, but it has become one of our top 3 dinner favorites. Fresh pico is at the heart of it, so how can you lose!?

Though they are ok (just ok) warmed in the microwave, we wanted to find a new way to enjoy corn tortillas. Obviously, they are best when fried in oil, but we wanted to find a way to cut calories significantly. Cooking spray is a great way to add a bit of flavor (we use the olive oil kind). They're an excellent alternative!

A CookieSheets&CakePans original!
Related Posts Plugin for WordPress, Blogger...