Sunday, October 3, 2010
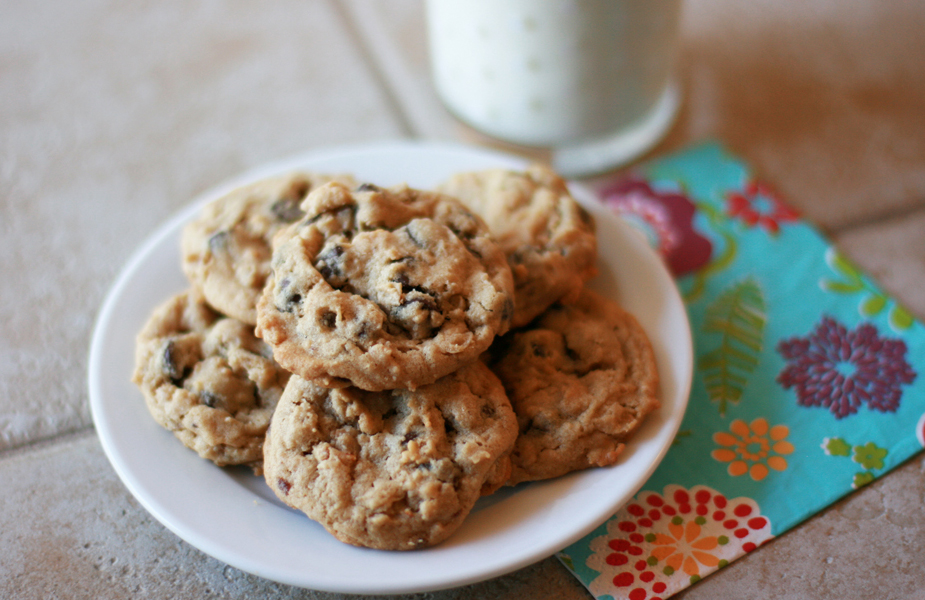
PB Oatmeal Chocolate Chip Cookies
1/2 cup butter
1/2 cup white sugar
1/3 cup brown sugar
1/2 cup peanut butter
1/2 tsp vanilla
1 egg
1 cup flour
1 tsp baking soda
1/4 tsp salt
1/2 cup rolled oats
1 cup semi-sweet chocolate chips
Preheat oven to 350°.
Combine butter and sugars and blend until smooth. Add peanut butter, vanilla, and egg.
Add flour, baking soda and salt (sifted together).
Mix in oats and chocolate chips.
Form tablespoon-sized balls and cook for 10-12 minutes.
Comments from the cook: This recipe came highly recommended from my mother in law, Debby. She was given the recipe by one of Brian's cousins, and I'm glad they eventually made their way into my kitchen!
These cookies reaffirm my belief that the marriage between peanut butter and chocolate is as steady and unbreakable as ever! :)
I didn't have creamy peanut butter on hand (which I usually use in recipes), but the chunky stuff worked quite well, and adds even more texture to these little darlings.
Originally shared by Debby Mathias, found online here
Monday, September 27, 2010
Pumpkin Muffins
Dry ingredients:
3 1/3 cups flour
2 tsp baking soda
3 cups sugar
1 1/2 tsp salt
1 tsp cinnamon
1 tsp nutmeg
1/4 tsp ground ginger
Wet ingredients:
1 cup oil
4 eggs
2/3 c water
2 cups solid pack pumpkin
Preheat oven to 350°.
Spray muffin tins with cooking spray or line with cupcake papers.
Combine dry ingredients. Then add wet ingredients. Stir until no longer lumpy.
Fill muffin tins 3/4 full and bake for 18-20 minutes, or until they pass the toothpick doneness test!
Brown Sugar Glaze:
1/4 cup butter (1/2 stick), melted
3/4 cup brown sugar
few shakes of salt from the salt-shaker
3/4 cup powdered sugar
1/4 cup milk
Melt butter in medium bowl. Add brown sugar and stir until dissolved.
Sprinkle salt in. Add powdered sugar. Mixture will be chunky (and resemble oatmeal!).
Add milk and stir until dissolved.
Dip mostly-cooled muffins upside-down in glaze, or wait a few moments and spread on with a knife.
Makes 36-40 muffins.
Comments from the cook: Pumpkin muffins = Fall. And, I fought everything in me to hoard the solid-pack pumpkin I found the other day...but these muffins? I'm no match for them, I tell you.
This is a huge recipe, and makes a LOT of muffins. My mom usually makes loaves, and just bakes them for longer. From what I remember, she usually made some loaves with walnuts. Just smother your bread/muffins with butter before eating, and you can't go wrong. Mmmmm-hmmmm.
This glaze was my first attempt at a non-cream-cheese frosting, and it is quite sweet. A brown sugar flavor without the thickness of frosting...
Originally a recipe from my mom. I managed to misplace it (or never wrote it down in a safe place), and then found a close facsimile online, here. (Mom, if yours is different, please email me IMMEDIATELY!)
3 1/3 cups flour
2 tsp baking soda
3 cups sugar
1 1/2 tsp salt
1 tsp cinnamon
1 tsp nutmeg
1/4 tsp ground ginger
Wet ingredients:
1 cup oil
4 eggs
2/3 c water
2 cups solid pack pumpkin
Preheat oven to 350°.
Spray muffin tins with cooking spray or line with cupcake papers.
Combine dry ingredients. Then add wet ingredients. Stir until no longer lumpy.
Fill muffin tins 3/4 full and bake for 18-20 minutes, or until they pass the toothpick doneness test!
Brown Sugar Glaze:
1/4 cup butter (1/2 stick), melted
3/4 cup brown sugar
few shakes of salt from the salt-shaker
3/4 cup powdered sugar
1/4 cup milk
Melt butter in medium bowl. Add brown sugar and stir until dissolved.
Sprinkle salt in. Add powdered sugar. Mixture will be chunky (and resemble oatmeal!).
Add milk and stir until dissolved.
Dip mostly-cooled muffins upside-down in glaze, or wait a few moments and spread on with a knife.
Makes 36-40 muffins.
Comments from the cook: Pumpkin muffins = Fall. And, I fought everything in me to hoard the solid-pack pumpkin I found the other day...but these muffins? I'm no match for them, I tell you.
This is a huge recipe, and makes a LOT of muffins. My mom usually makes loaves, and just bakes them for longer. From what I remember, she usually made some loaves with walnuts. Just smother your bread/muffins with butter before eating, and you can't go wrong. Mmmmm-hmmmm.
This glaze was my first attempt at a non-cream-cheese frosting, and it is quite sweet. A brown sugar flavor without the thickness of frosting...
Originally a recipe from my mom. I managed to misplace it (or never wrote it down in a safe place), and then found a close facsimile online, here. (Mom, if yours is different, please email me IMMEDIATELY!)
Saturday, September 18, 2010
Banana Streusel Muffins
Muffins:
1 cup flour
1/2 c granulated sugar
3/4 tsp baking powder
1/2 tsp baking soda
1/2 tsp salt
4 TBSP (1/2 stick) unsalted butter, melted
1/2 cup plain yogurt)
1 lg egg, lightly beaten
1 lg banana, mashed
1 tsp vanilla
Topping:
1 TBSP cold butter, cut into pieces
1 TBSP brown sugar
3/4 tsp ground cinnamon
1 TBSP flour
salt
Preheat oven to 350°. Spray a loaf pan or muffin pan with non-stick cooking spray.
In a large bowl, whisk together 1 cup flour, the sugar, baking powder, baking soda and 1/2 teaspoon salt.
Stir in the melted butter and plain yogurt. Add the egg and beat for 1 minute. Add the banana and vanilla. Stir until well combined. Spread the mixture evenly into the prepared pan or into muffin tin (makes about 12 muffins).
Make topping by mashing together the tablespoon of cold butter with the tablespoon of flour, the brown sugar, cinnamon, nutmeg and a pinch of salt. Distribute the topping evening over the batter. Bake for 40-45 minutes for loaf or 20-25 minutes for muffins, or until toothpick comes out clean.
Cool for 10 minutes before removing from loaf pan or muffin tin.
Comments from the cook: A.Maz.Ing. These muffins represent one of my few cooking ventures since I've been so sick and pregnant. They are fantastic, and the streusel topping is to DIE FOR.
I doubled this recipe, and it made about 20 muffins. I've always been a fan of streusel, so I actually did a little more than the recipe called for. That can't hurt anything, right??
Best served with Mylanta...or your juice of choice! :)
Wednesday, June 2, 2010
Jell-O Cake
1 white cake mix, made as directed
1 small pkg sugar free strawberry Jell-O
1 cup boiling water
1/2 cup very cold water
1 small pkg vanilla pudding
1 small tub whipped cream
milk
Cake:
Prepare cake as directed. Allow to cool 2+ hours. Using fork, poke holes in cooled cake. (I do them about 3/4" apart...)
Boil 1 cup water and stir into strawberry Jell-O until dissolved. Stir in 1/2 cup very cold water until all powder is dissolved.
Pour Jell-O mixture over holes in cake, and allow to cool in fridge for a couple of hours.
Frosting:
Prepare small package of vanilla pudding according to pie filling directions. Place in fridge and allow to thicken for 5 minutes.
Fold a small container of whipped cream into pudding mixture.
Cover cake with frosting and serve chilled.
Comments from the cook: Hardly an original! A favorite that my mom always made when we were growing up, Jell-O cake is the perfect dessert for a BBQ or picnic (as long as it can stay chilled until you serve it).
Betty Crocker calls this "Poke Cake" and her recipe calls for raspberry gelatin. We've tried lots of different red flavors, and have never found one we didn't like.
A Sleight family favorite, shared by my mom since the 80s!
Saturday, May 8, 2010
California Burritos


2 lbs Carne Asada (recipe below)
4-6 small potatoes
Homemade Pico de Gallo
sour cream
shredded cheese
6-8 uncooked tortillas
canola or olive oil
Carne Asada:
2 lbs steak, cut into small pieces
4 cloves garlic, minced
1 jalapeno, seeded and diced
1/2 bunch cilantro, finely chopped
2 limes, juiced
2 TBSP white vinegar
1/2 tsp sugar
1/2 cup olive oil
Cut steak into small pieces. Combine all other ingredients in large bowl, and add steak. Allow to marinate overnight.
Fry in skillet over medium-high heat until browned.
Potatoes:
Cut potatoes into 1/2" cubes. Add 2 TBSP canola or olive oil to pan and cook in skillet over medium-high heat until some edges are slightly browned. Add 1/2 cup warm water and cover until potatoes are cooked thoroughly. Flavor with salt to taste.
Pico de Gallo:
Prepare Pico the night before and allow to sit overnight.
Assemble:
Cook tortillas. Add sour cream to bottom of tortilla. Add Carne Asada and potatoes. Sprinkle with cheese and cover with Pico de Gallo.
Serve with Mexican rice or tortilla chips.
Comments from the cook: This recipe is our Cinco de Mayo tradition! When Brian served his mission in San Diego, he discovered the miracle that is the California burrito. Nothing fancy...just lots of steak, cheese, and potatoes. After we were married, he found a local place (called Beto's then) and managed to eat one almost every time I went out of town.
They quickly became one of his favorite indulgences, and it only seemed appropriate that we try to make them ourselves. We've enjoyed them with friends for the last 3 Cinco de Mayos and plan to eat them for many years to come!
Monday, May 3, 2010
Moment of Silence...
April was a whirlwind.
Easter.
My mom coming to town.
My birthday.
My in-laws here for a visit.
My husband's first doctoral recital.
A head-cold to end all head colds.
So, here we have May.
I'm dying to make a batch of Pink Lemonade Cookies (you'll LOVE these) and have a few things up my sleeve...
More recipes to come. Promise.
Easter.
My mom coming to town.
My birthday.
My in-laws here for a visit.
My husband's first doctoral recital.
A head-cold to end all head colds.
So, here we have May.
I'm dying to make a batch of Pink Lemonade Cookies (you'll LOVE these) and have a few things up my sleeve...
More recipes to come. Promise.
Wednesday, April 21, 2010
Chicken Pasta Salad
4 svgs farfalle (bowtie) pasta
3 svgs garden rotini pasta
1 chicken breast
1/2 cup Italian dressing
1/2 cucumber, cut into 1/2" chunks
pasta salad seasoning, to taste
Prepare pastas as directed. Drain and run under cool water until room temperature (or cooler if desired).
Cut chicken breast into small chunks and pan fry over medium heat. Add 1 TBSP of Italian dressing to chicken chunks when chicken is almost finished cooking.
Toss chicken, cucumber, and pastas together.
Add dressing (amount is really up to you, and depends on your tastes) and pasta salad seasoning.
Best when served chilled for an hour or so. Serves 6+.
To rejuvenate the next day, toss with a bit more salad dressing and another couple of shakes of pasta salad seasoning.
Comments from the cook: I debated whether or not to post this recipe. It's not really MY recipe. It's just 6 ingredients. Nothing is really homemade (unless you call browning a chicken breast HOMEMADE). But we eat it (or some version of it) at least once a week in the summertime. And I'm the boss of this very food blog, so I can post whatever I want! :)
If you read my other blog, you'll know that pasta salad seasoning is a BIG DEAL to me. My mom found a seasoning called "Salad Elegance" long ago (made by Johnny's), we got hooked on it, and then I moved to Utah. It was hard to find there, but not impossible. And then the place I always bought it stopped carrying it. So I did what any normal person would do. I ordered a $30 2.5-lb tub of it. And I've not been happier with a purchase ever since.
McCormick makes a version called Salad Supreme (sold in the spice section), which will work, if you don't have access to the loveliness that is Salad Elegance. My observation was that McCormick's SS has more celery salt, and is not as light tasting...but we ate it when times were hard and Johnny's got the boot from our local store. Until we took matters into our own hands, that is.
Variations of pasta salad are endless. My mom has added fresh tomatoes and olives to hers before. We also do a version that is just spaghetti noodles, cut-up pepperonis, chunks of cheese, Italian dressing, and Salad Elegance (for dinner when we're trying to UP the taste and HOLD the healthy!)
Either way, this is one of our favorites. And, I tell you, I've never been happier to own $30 of a spice.
Originally made by my mom, Alane Sleight.
3 svgs garden rotini pasta
1 chicken breast
1/2 cup Italian dressing
1/2 cucumber, cut into 1/2" chunks
pasta salad seasoning, to taste
Prepare pastas as directed. Drain and run under cool water until room temperature (or cooler if desired).
Cut chicken breast into small chunks and pan fry over medium heat. Add 1 TBSP of Italian dressing to chicken chunks when chicken is almost finished cooking.
Toss chicken, cucumber, and pastas together.
Add dressing (amount is really up to you, and depends on your tastes) and pasta salad seasoning.
Best when served chilled for an hour or so. Serves 6+.
To rejuvenate the next day, toss with a bit more salad dressing and another couple of shakes of pasta salad seasoning.
Comments from the cook: I debated whether or not to post this recipe. It's not really MY recipe. It's just 6 ingredients. Nothing is really homemade (unless you call browning a chicken breast HOMEMADE). But we eat it (or some version of it) at least once a week in the summertime. And I'm the boss of this very food blog, so I can post whatever I want! :)
If you read my other blog, you'll know that pasta salad seasoning is a BIG DEAL to me. My mom found a seasoning called "Salad Elegance" long ago (made by Johnny's), we got hooked on it, and then I moved to Utah. It was hard to find there, but not impossible. And then the place I always bought it stopped carrying it. So I did what any normal person would do. I ordered a $30 2.5-lb tub of it. And I've not been happier with a purchase ever since.
McCormick makes a version called Salad Supreme (sold in the spice section), which will work, if you don't have access to the loveliness that is Salad Elegance. My observation was that McCormick's SS has more celery salt, and is not as light tasting...but we ate it when times were hard and Johnny's got the boot from our local store. Until we took matters into our own hands, that is.
Variations of pasta salad are endless. My mom has added fresh tomatoes and olives to hers before. We also do a version that is just spaghetti noodles, cut-up pepperonis, chunks of cheese, Italian dressing, and Salad Elegance (for dinner when we're trying to UP the taste and HOLD the healthy!)
Either way, this is one of our favorites. And, I tell you, I've never been happier to own $30 of a spice.
Originally made by my mom, Alane Sleight.
Sunday, April 18, 2010
French Silk Pie

3 oz. unsweetened chocolate (3 - 1 oz. squares)3/4 cup butter
1 cup sugar
1 1/2 tsp vanilla
3 eggs
1/2 pint whipping cream
1 TBSP sugar
1 deep-dish pie shell, prepared as directed
1 Hershey chocolate bar
Melt unsweetened chocolate and allow to cool 5-10 minutes (or use pre-melted, squeezable packets).
Cream butter and sugar. Add unsweetened chocolate and vanilla. Mix on medium speed until blended.
Add eggs one at a time, beating with electric mixer for 5 minutes after each one.
Pour chocolate mixture into fully-cooked deep-dish pie shell.
Beat whipping cream with 1 TBSP sugar until firm.
Top pie with whipped cream and refrigerate at least 4 hrs before serving.
Decorate with chocolate curls if desired. (Grate Hershey bar with carrot peeler, running peeler down the edge of the bar to form curls.)
Comments from the cook's wife: This pie. Ohhhh, this pie. French Silk Pie is one of Brian's absolute favorites, and this recipe came from a family friend of his (and now mine), Vicki Luker. While our preference is always to go with a pastry crust, Vicki's original recipe calls for an Oreo or chocolate graham cracker crust.
This pie is one of Brian's favorites to make, and I've never discouraged him! While you're at it, you may even want to make two of these babies. They are sure to disappear in the blink of an eye! Some recipes discourage doubling, but this one doubles without any problem.
Originally shared by Vicki Luker, the Minnesotan Queen of Dessert.
Tuesday, April 13, 2010
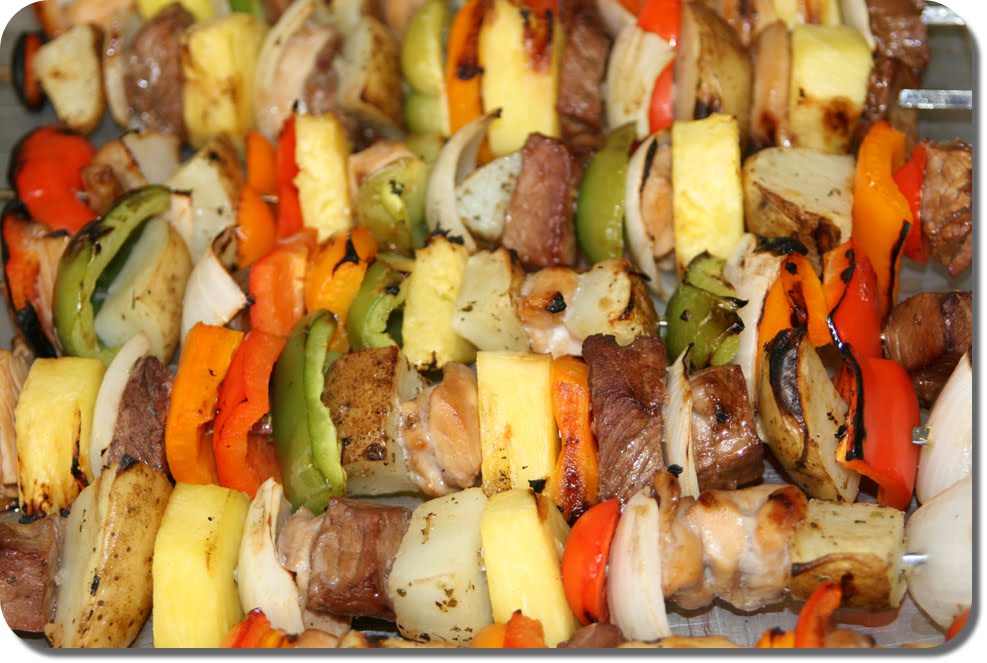
Teriyaki Kabobs
Marinade:1 cup water
1 cup soy sauce
1 cup sugar
1 tsp garlic
2 TBSP green onion, chopped
1 tsp fresh ginger, grated
To be skewered:
1 green bell pepper
1 red bell pepper
1 small onion
1 fresh pineapple
fresh chicken breasts (frozen ok, defrosted)
steak (stew meat ok)
Potatoes:
3 russet (or red) potatoes
1 tsp rosemary
1 tsp thyme
1 tsp sea salt
1/2 tsp pepper
3 TBSP olive oil
Combine marinade ingredients in glass bowl. (Separate into 2 medium bowls if doing separate containers for chicken and beef).
Cut meat (chicken and beef) into 1" pieces and place in marinade. Refrigerate and allow to sit for 2 hrs.
In the meantime, cut potatoes into 1" pieces and boil for 4 minutes. Drain and allow to cool and dry on dishcloth for about 30 min. When cooled, toss in about 3 TBSP olive oil. Add rosemary, thyme, sea salt, and pepper.
Cut veggies and pineapple into 1" pieces.
Assemble skewers. Grease skewers slightly (dip your thumb and index finger in oil and run it down the skewer) before adding meat and veggies.
Alternate veggies, potatoes, meat, and pineapple as desired.
Heat grill to hottest temperature, and cook skewers evenly over fire. Rotate as needed.
Don't have a grill? Have one and it gives out? Broil them in the oven! Place skewers on a cookie sheet, and cook on top rack. Watch them closely and turn them every couple of minutes in order to avoid overcooking.
Comments from the cook's wife: This really is Brian's recipe, so I can't say much...beyond how much I LOVE these, and how much you need to try them!
The measurements for the marinade are not set in stone. If you don't think it's enough, double it. If you only want to make a few skewers worth, make a bit less. Brian learned to combine sugar, garlic, soy sauce, ginger, and green onions from a man on his mission, and has never been the same since! We have eaten many-a-meal with that sauce as a base, and look forward to more in the future.
We use metal skewers (we upgraded a year ago), but the inexpensive wood ones also work. We read online that they need to soak in water for about 30 minutes ahead of time. This apparently keeps the wood from burning as quickly.
Kabobs are very filling, but making a few extra might be just what you're looking for. They make for EXCELLENT leftovers. (Just push the meat and veggies off the skewer with a fork, and store them in an air-tight container. Reheat for 3-4 minutes in the microwave and enjoy again!)
A CookieSheets&CakePans original.
Monday, April 5, 2010
Chocolate-Dipped Strawberries

2 (1 lb) cartons fresh strawberries
1 bag Ghiradelli milk chocolate chips
3 squares almond bark (or about 2/3 white chocolate chips)
1 tsp canola oil
Wash strawberries and allow them to dry completely before dipping. (I let mine dry on a kitchen towel overnight.)
Cover a cookie sheet with wax paper and set aside.
Use a double boiler to melt chocolate chips, adding about 1/2 tsp canola oil to bowl of chips before melting.
(Don't have a double boiler? No sweat. You can melt the chocolate chips in a microwaveable bowl. In order to avoid burning/overcooking the chocolate, you'll want to melt for 30 seconds, take out and stir, melt another 30 seconds, stir, etc...until they've melted completely.)
Dip strawberries in first chocolate flavor and place on wax paper-covered cookie sheet. Refrigerate until first layer has hardened.
Dip strawberries in second flavor if desired (chocolate may need to be reheated for a few seconds if it has thickened) and place back on cookie sheet.
Use a fork to "flick" chocolate across tops of strawberries.
Best when served chilled.
Comments from the cook: Another recipe that hardly needs an explanation! My dear friend Mary Ann made these for my outrageously-embarrassing bridal shower a few years ago (ok, five) and told me that the secret to these is in the little bit of oil (isn't it always?). She's a fantastic cook, so I always do what she tells me. :)
Shared by Mary Ann Hawes, my old roommate and friend.
Monday, March 29, 2010
Bowtie Chicken Caesar Salad

1-2 servings farfalle (bowtie) pasta, prepared as directed
1 pkg chicken breast pieces, plain
1 medium tomato, diced
mozzarella cheese, grated
lettuce
croutons
caesar dressing
Prepare pasta as directed. Rinse with cold water until pasta is cool to the touch. Drain.
Wash, dry, then tear lettuce. Dice tomato and grate cheese.
Cut chicken into smaller pieces if desired. (The pre-packaged kind usually comes in fairly large strips, so we generally cut them down into smaller bite-sized chunks.)
Assemble and top with caesar dressing of your choice.
Comments from the cook: This is one of our warm-weather recipes of choice! When we were still in UT, my co-workers and I frequented a place called Pizza Factory for office birthdays. This was my favorite dish there (served with their classic bread-twist). When we moved, I realized that I could re-create it fairly easily.
No fancy ingredients and no extensive preparation required. You can dry your own croutons, whip up your own caesar dressing, and grow your own lettuce if you really want to...but this one's an easy summer meal that you should really try. We usually use romaine lettuce, but only had iceberg around. Would be tasty with spinach leaves tossed in as well.
If you're trying to save a few pennies (packaged chicken is usually about $2.50), use an old-fashioned frozen chicken breast and prep your own chicken pieces in a skillet. Add a bit of salad dressing right before they're done browning for extra flavor.
A CookieSheets&CakePans original...kinda. :)
Monday, March 22, 2010
Brian's Pizza Hut Pan Pizza & Breadsticks


Sauce:
1 (15oz) can tomato sauce
2 tsp dry oregano
1 tsp marjoram
1 tsp dry basil
1 tsp garlic salt
Dough:
1 1/3 cups warm water
1/4 cup non-fat powdered milk
1/2 tsp salt
4 cups flour
1 TBSP granulated sugar
1 package dry yeast
2 TBSP canola oil (for dough)
canola oil (for pan)
cooking spray
Pizza toppings:
mozzarella cheese
pepperoni
Breadstick seasoning:
2 TBSP parmesan cheese
1 1/2 TBSP garlic powder
1 1/2 tsp oregano
1 1/2 tsp onion salt
Combine sauce ingredients and allow to sit for 1 hr.
Put yeast, sugar, salt, and dry milk in KitchenAid bowl (or mixer of your choice).
Add water and mix well using whisk attachment. Let rest for 2 minutes.
Add oil and stir again. Let rest 2 more minutes.
Now using the hook attachment, add flour and stir until dough forms and flour is absorbed.
Remove from bowl and knead by hand for about 1 minute. Put back in KitchenAid bowl and knead with dough hook on medium speed for 4-5 minutes.
Roll out to 1/4"-3/8" for one large pizza and one small pan of breadsticks. Turn large (14") deep-dish pizza pan over top of dough. Press down hard (cookie-cutter style) to cut the dough. Use knife if cut is not entirely clean.
Collect cuttings. Roll out to same thickness, and turn small deep-dish pan (round 9" cake pan will work) over cuttings to slice.
After cutting and before placing dough in pizza pans, spray sides of pan with cooking spray. Add a small amount of oil to the bottom of the pizza and breadstick pans. Original recipe calls for a large quantity (tastes better, but a lot more fat!), but a thin coating to cover the bottom of the pan is sufficient.
Add dough to both pans. Cover with foil. Place in oven heated to lowest setting ("warm", usually) and allow to rise for 1-1 1/2 hrs.
Add sauce and toppings as desired, and cook at 475° until outer crust is brown.
For breadsticks:
Sprinkle with seasoning, then cook at 475° until edges of crust turn brown.

Comments from the cook: We were on a real knock-off kick for awhile, and this has become one of our staple pizza recipes. While the crust is not quite as chewy as Pizza Hut's pan pizza, the taste is very similar.
One of the most important things about this recipe is the pan. You must (read: MUST) use a deep dish pan. Using a flat pizza pan obviously won't work, but you can get creative otherwise. We've made it in a 13x9 pan before (and it worked perfectly) and have made it in multiple 9" round cake pans before too.
Funny story. Brian and I had been married about a year, and went home to be with my family for Thanksgiving. They wanted him to make this pizza (my brother, Neil, is the 2nd biggest pizza fan ever...behind Brian, that is) and we needed a large deep-dish pan in order to make pizza for such a large crowd. So we set out to find one. We didn't find anything in the pizza pan section at Wal-mart, until my mom was walking away. There was a large metal deep-dish pan sitting there that was PERFECT for the job. We needed 2, but only found the one...and figured we'd just use cake pans for the rest. We got to the register to find out how much the pan was. It rang up $3. Score! Best part? The description was PET DISH. ha! Sturdy, metal, and perfect for $3. When we returned from vacation, we went and bought 2 for ourselves. Still use them to this day. :)
Originally found online and adapted by Brian, the pizza king.
Subscribe to:
Posts (Atom)